Introduction to Screen Recording on Android

Screen recording on Android allows users to capture their screen activity, including video, audio, and interactions. This feature is useful for various purposes such as creating tutorials, recording gameplay, or capturing video calls. Depending on your Android version and device model, you may have different options for screen recording.
Built-In Screen Recording Features
Starting with Android 11, Google introduced a built-in screen recording feature that is accessible from the Quick Settings menu. This built-in feature is easy to use and offers a range of options for customization.
How to Access Screen Recording on Android 11 and Later
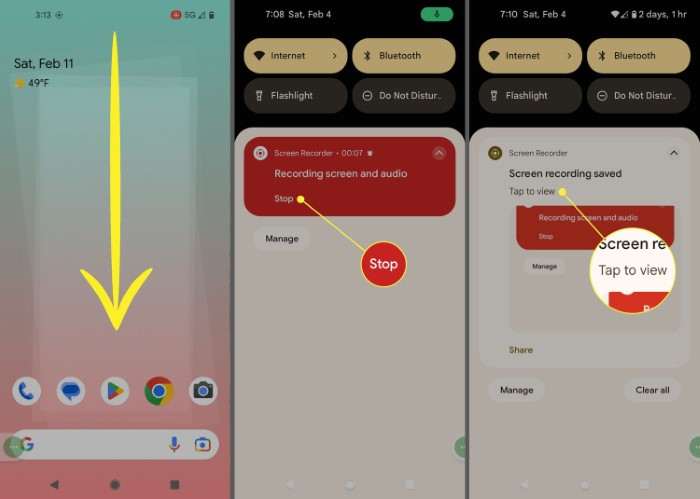
- Swipe Down from the top of the screen to open the Quick Settings menu.
- Look for the Screen Record Icon – it looks like a video camera or a screen with a dot.
- Tap the Icon to start recording. You may be prompted to grant permissions for audio and screen recording.
- Choose Your Recording Options – you can select whether to record audio and show touches on the screen.
- Start Recording – tap “Start” to begin the recording process. A countdown will appear before the recording starts.
- Stop Recording – swipe down to access the notification shade and tap the “Stop” button to end the recording.
Using Third-Party Screen Recording Apps
If your device does not support built-in screen recording or if you require additional features, third-party apps can provide an excellent alternative. Here are some popular screen recording apps for Android:
Top Screen Recording Apps
- AZ Screen Recorder: Known for its easy-to-use interface and high-quality recordings.
- DU Recorder: Offers a wide range of editing features and supports live streaming.
- Mobizen Screen Recorder: Provides excellent performance and various customization options.
How to Screen Record on Android Using Built-In Features
Step-by-Step Guide for Android 11 and Later
- Open Quick Settings: Swipe down from the top of the screen.
- Find and Tap Screen Record: Locate the screen record icon and tap it.
- Set Recording Options: Choose whether to record audio and show touches.
- Begin Recording: Tap “Start” to begin capturing your screen.
- End Recording: Swipe down and tap “Stop” in the notification shade.
Step-by-Step Guide for Android 10 and Earlier
- Download a Screen Recording App: Install a third-party app like AZ Screen Recorder or DU Recorder from the Google Play Store.
- Open the App: Launch the screen recording app from your app drawer.
- Configure Settings: Adjust recording settings such as resolution, frame rate, and audio options.
- Start Recording: Tap the record button to begin capturing your screen activity.
- Stop Recording: Use the app’s controls to stop the recording and save the file.
How to Screen Record on Android Using Third-Party Apps

Step-by-Step Guide for AZ Screen Recorder
- Install AZ Screen Recorder: Download and install the app from the Google Play Store.
- Open the App: Launch AZ Screen Recorder.
- Configure Settings: Set up your recording preferences, such as video resolution and frame rate.
- Start Recording: Tap the record button to begin capturing your screen.
- Stop Recording: Use the floating toolbar to stop the recording and access your saved videos.
Step-by-Step Guide for DU Recorder
- Install DU Recorder: Download and install the app from the Google Play Store.
- Open the App: Launch DU Recorder.
- Set Recording Preferences: Adjust settings for video quality, resolution, and audio.
- Start Recording: Tap the record button to begin capturing your screen activity.
- Stop Recording: Use the notification panel or app interface to stop the recording and save your video.
Editing and Managing Your Screen Recordings
After recording your screen, you may want to edit or manage your videos. Here are some tips for handling your recordings:
Basic Editing Features
- Trimming: Cut out unwanted parts from the beginning or end of your video.
- Cropping: Remove unwanted sections of the video frame.
- Adding Text: Insert text overlays for additional context or annotations.
Advanced Editing Techniques
- Merging Videos: Combine multiple screen recordings into one seamless video.
- Adding Effects: Enhance your video with visual effects, transitions, and animations.
- Adjusting Audio: Edit audio tracks, add background music, or adjust volume levels.
Troubleshooting Common Issues

Even with the best setup, you may encounter issues while screen recording. Here are solutions to common problems:
Screen Recording Not Working
- Check Permissions: Ensure that the screen recording app has the necessary permissions.
- Restart Device: A simple reboot may resolve temporary glitches.
- Update Software: Make sure your Android OS and screen recording app are up-to-date.
Audio Issues
- Verify Audio Settings: Check if audio recording is enabled in the settings.
- Use External Microphone: For better audio quality, consider using an external microphone.
- Check App Permissions: Ensure that the app has permission to access your microphone.
Performance and Storage Problems
- Clear Storage Space: Make sure you have enough free space on your device for recording.
- Close Background Apps: Free up system resources by closing unnecessary apps.
- Adjust Recording Quality: Lower the resolution or frame rate to reduce file size and performance impact.
Related Post:
My Tri C Space: A Comprehensive Guide
Exploring Taylor Swift’s “Blank Space”: A Deep Dive into the Hit Song
The Ultimate Guide to “Power Rangers in Space”
Screen recording on Android is a powerful feature that can enhance your digital experience, whether for personal, educational, or professional purposes. With the built-in options available in newer Android versions and the wide range of third-party apps for older versions, you can easily capture and share your screen activities. Follow the steps and tips provided in this guide to make the most of your screen recording endeavors.
By understanding how to access and use both built-in and third-party screen recording tools, you can create high-quality recordings tailored to your needs. Happy recording!


