Understanding Cache in Chrome on Android

Before diving into the steps to clear the cache, it’s important to understand what cache is and why it’s stored. Every time you visit a website, Chrome saves some of its data locally on your device to reduce load times during your next visit. This includes images, scripts, and other content that doesn’t need to be downloaded again on repeat visits. While caching improves your browsing speed, over time, the cache can pile up and start affecting the browser’s performance.
Why Clearing Cache in Chrome is Important
Cache accumulation is normal, but it can cause several problems if left unchecked. Here are a few reasons why clearing the cache in Chrome on Android is beneficial:
- Improved Performance: A browser that’s overloaded with cached files can become sluggish. Clearing the cache can help speed up Chrome.
- Freeing Up Storage: Cached files take up storage space on your device. If you’re running low on storage, clearing the cache can give you some breathing room.
- Fixing Errors and Glitches: Sometimes, websites update their structure or design, but Chrome may continue loading the older, cached version, causing errors. Clearing the cache can resolve this issue.
- Protecting Privacy: Cached files include parts of the websites you’ve visited. If you’re concerned about privacy, clearing the cache can help ensure that your browsing history isn’t stored locally on your device.
Now that you know why clearing the cache is important, let’s look at how you can do it in Chrome on your Android phone.
How to Clear Cache in Chrome on Android: Step-by-Step Guide
Clearing the cache in Chrome on Android is a simple process, and it can make a noticeable difference in performance and browsing experience. Follow these steps:
Open Chrome on Your Android Device
The first step is to open Google Chrome on your Android smartphone or tablet. The Chrome app is represented by a round icon with red, green, yellow, and blue colors. Tap on it to launch the browser.
Tap the Menu Icon (Three Dots)
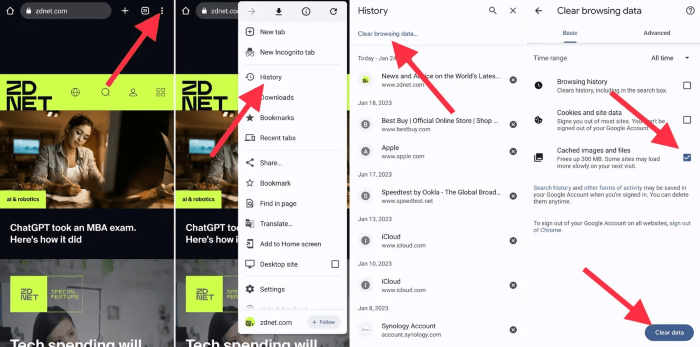
In the top-right corner of the Chrome browser, you will see a menu icon represented by three vertical dots. Tap this icon to open the menu.
Select “Settings”
From the dropdown menu that appears, scroll down and tap on “Settings.” This will open the settings page, where you can manage different aspects of the browser.
Go to “Privacy and Security”
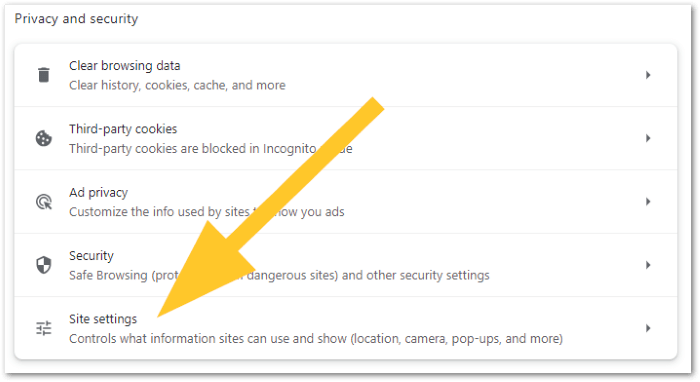
Once in the settings menu, scroll down and find the section labeled “Privacy and Security.” This is where you’ll find all the options related to your browsing data, including the ability to clear the cache.
Tap on “Clear Browsing Data”
Under “Privacy and Security,” select the option that says “Clear browsing data.” This is where you’ll manage what types of stored data you want to delete, including cached images and files.
Choose the Time Range
At the top of the “Clear browsing data” screen, you’ll see an option labeled “Time range.” Tap on this to select the time period for which you want to clear data. You can choose between options like “Last hour,” “Last 24 hours,” “Last 7 days,” “Last 4 weeks,” or “All time.”
For clearing all cached files, select the “All time” option.
Select “Cached Images and Files”
In the list of data types to clear, make sure the option labeled “Cached images and files” is checked. You can also choose to clear other types of data, such as cookies or browsing history, but for this guide, we’ll focus on the cache.
Tap “Clear Data”
Once you’ve made your selections, tap the “Clear data” button. Chrome will now delete the cached files and free up space on your Android device.
Restart Chrome for Optimal Performance
After clearing the cache, it’s a good idea to restart Chrome to ensure the browser runs smoothly. Close the app completely and then reopen it to notice the difference in performance.
When to Clear Cache in Chrome on Android

Clearing the cache isn’t something you need to do regularly, but there are certain situations when it’s beneficial to do so. Here are some instances when clearing the cache is recommended:
- Chrome is Running Slow: If Chrome is taking longer than usual to load pages, it could be due to too much cached data. Clearing the cache can help improve speed.
- Encountering Website Errors: If you’re seeing errors like “404 Not Found” or pages that aren’t loading properly, a cached version of the website may be to blame. Clearing the cache can solve these issues.
- Freeing Up Storage Space: If your Android device is running low on storage, clearing the cache can help free up some space without deleting important files or apps.
- After a Browser Update: Sometimes, updates to Chrome or specific websites can make cached data obsolete. Clearing the cache after an update can ensure that everything runs smoothly.
Advantages and Disadvantages of Clearing Cache in Chrome
Like most actions, clearing the cache has its pros and cons. Let’s take a look at both:
Advantages
- Faster Performance: Clearing the cache can improve Chrome’s performance, especially if it’s been sluggish.
- More Storage Space: Cache files can take up a significant amount of space over time. By clearing them, you free up valuable storage on your Android device.
- Fixing Display Issues: Cached data from outdated websites can cause display issues, and clearing the cache can resolve them.
- Better Privacy: Removing cached data helps maintain your privacy, as website data won’t be stored locally on your device.
Disadvantages
- Temporary Loss of Faster Load Times: Clearing the cache means Chrome will have to reload website data the next time you visit, which may result in slightly slower load times for the first visit.
- Signed Out of Some Websites: Clearing cache might sign you out of some websites if you’ve also cleared cookies. You may need to log back in.
- Deleted Offline Content: If you use certain websites offline, clearing the cache can result in the loss of that saved content.
Alternatives to Clearing Cache Regularly

Clearing the cache is a quick and effective way to improve Chrome’s performance, but there are alternatives to regularly clearing it that can also help keep your browser running smoothly.
Use Incognito Mode
If you’re concerned about cached data building up or being stored on your device, consider using Chrome’s Incognito Mode. In this mode, Chrome doesn’t save any browsing history, cookies, or cached data once you close the session.
Manage Site-Specific Cache
Instead of clearing all cached files, you can clear cache for specific websites in Chrome. Here’s how to do it:
- Go to the website in Chrome.
- Tap on the three-dot menu and select “Site settings.”
- Choose “Clear & reset” to delete cached data for that particular site.
This is useful if you’re experiencing issues with one specific website and don’t want to clear the entire cache.
Regularly Update Chrome
Sometimes, performance issues in Chrome are caused by outdated software rather than cached data. Make sure you keep Chrome updated to the latest version to ensure optimal performance.
Limit Background Processes
Running too many apps in the background can slow down your device, including Chrome. Close unused apps and tabs to reduce memory usage and improve performance.
Related Post:
Can You FaceTime on Android? Exploring Alternatives and Solutions
How to Find Hidden Apps on Android: A Comprehensive Guide to Uncovering Those Elusive Applications
Seamless Data Transfer: How to Transfer Data from Android to iPhone After Setup
Clearing the cache in Chrome on your Android device is a simple yet effective way to improve performance, fix errors, and free up storage space. While clearing the cache can lead to a slight slowdown in page load times on first visits, the benefits far outweigh the drawbacks. By following the steps outlined in this guide, you can ensure that Chrome runs smoothly and efficiently on your Android phone or tablet.


